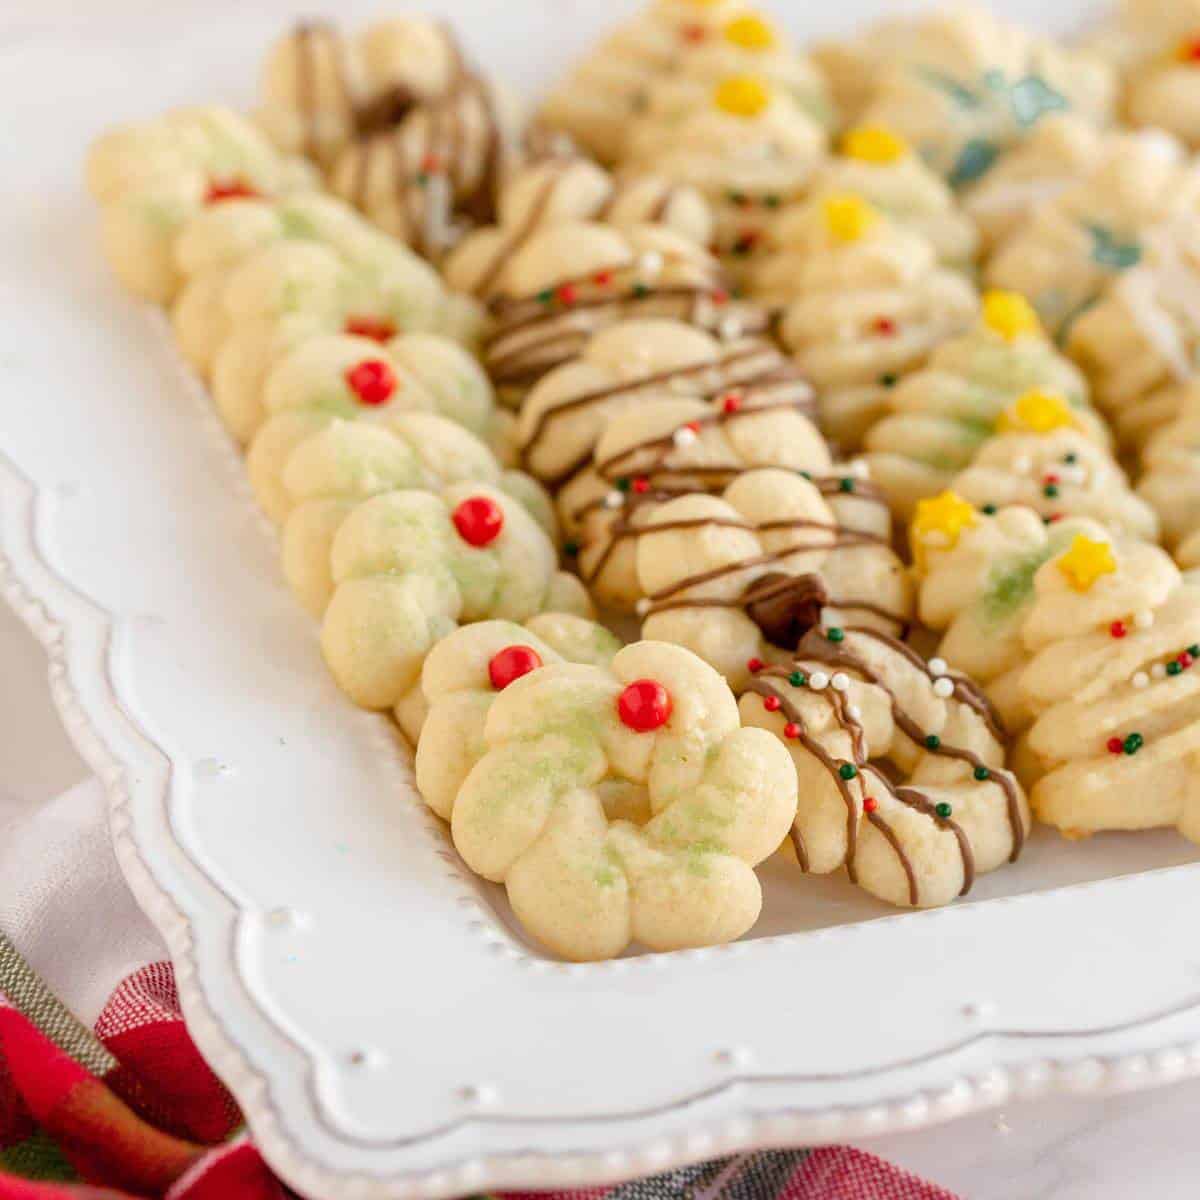
Classic Buttery Spritz Cookies (Super easy!)
This post may contain affiliate links. See our affiliate policy here.
Alright, let’s tighten this up, keep your personality, and ditch the ramble without losing the charm 👇
Spritz cookies are one of those recipes that just feel like the holidays. Buttery, simple, and honestly a little chaotic in the best way if kids are involved.
These are the kind of cookies you make when you want something festive without making your life harder. The dough comes together fast, presses easily, and you can crank out a LOT of cookies in no time.
This is one I come back to every year for cookie boxes, or just to have something fun to do in the kitchen. My favorite part is letting the kids pick the shapes and go wild with decorating. The combos they come up with are… creative, let’s say.
You can keep them simple, dress them up with sprinkles, or even turn them into a little DIY cookie kit for friends. Just know your audience on that one – some people will love it, some will be like “cool… now what?”
Either way, these are easy, fun, and make your kitchen smell amazing. That alone is reason enough.
Step-by-step photos and instructions are below. Jump to the recipe card if you wish!

Why you’ll love this
- It’s an easy recipe using basic ingredients that you can double, triple or quadruple and make a lot of cookies!
- If you have more than one cookie press, you can have multiple kids make their very own Christmas cookie tray of Spritz Cookies. So much fun for them to decorate and bake!
Why are they called Spritz Cookies?
The name originates from the German word “Spritzen”. The name spritz means “to squirt” in English. This makes total sense, since we literally squirt the batter out of a cookie press!
What is the difference between a spritz cookie and a shortbread cookie?
Very little, but the main difference is spritz cookies are pressed and baked immediately, with no need for chilling and slicing.
Step-by-step photos and tips and tricks are below. Jump to the full recipe card instead
Recommended Equipment/Tools
(affiliate links may be used here, which helps me earn some pennies – with no increased pricing to you)
If you don’t have cookie presses (yet), grab one from Amazon!
If you DON’T have a cookie press, and still want to try these, you could use a small cookie scoop and just add blobs of dough to a cookie sheet (this is not a great recipe for cookie cutters, since this is a soft dough), then flatten a little.
You can also dump the dough into a piping bag or pastry bag, and make them that way. They won’t be as pretty but they will taste the same!
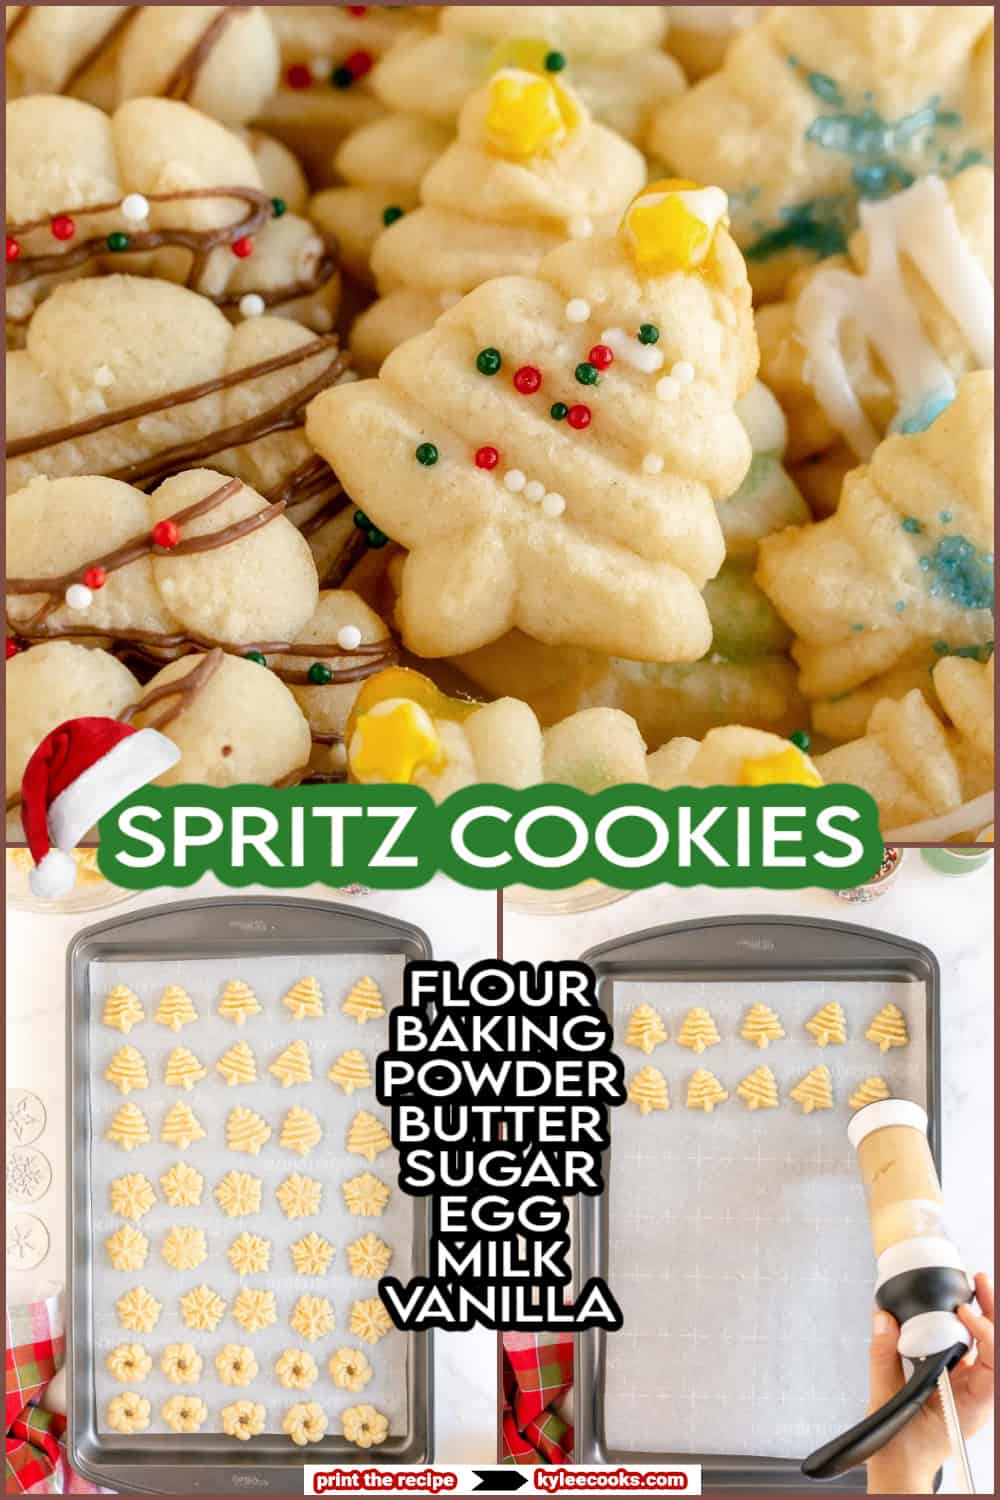
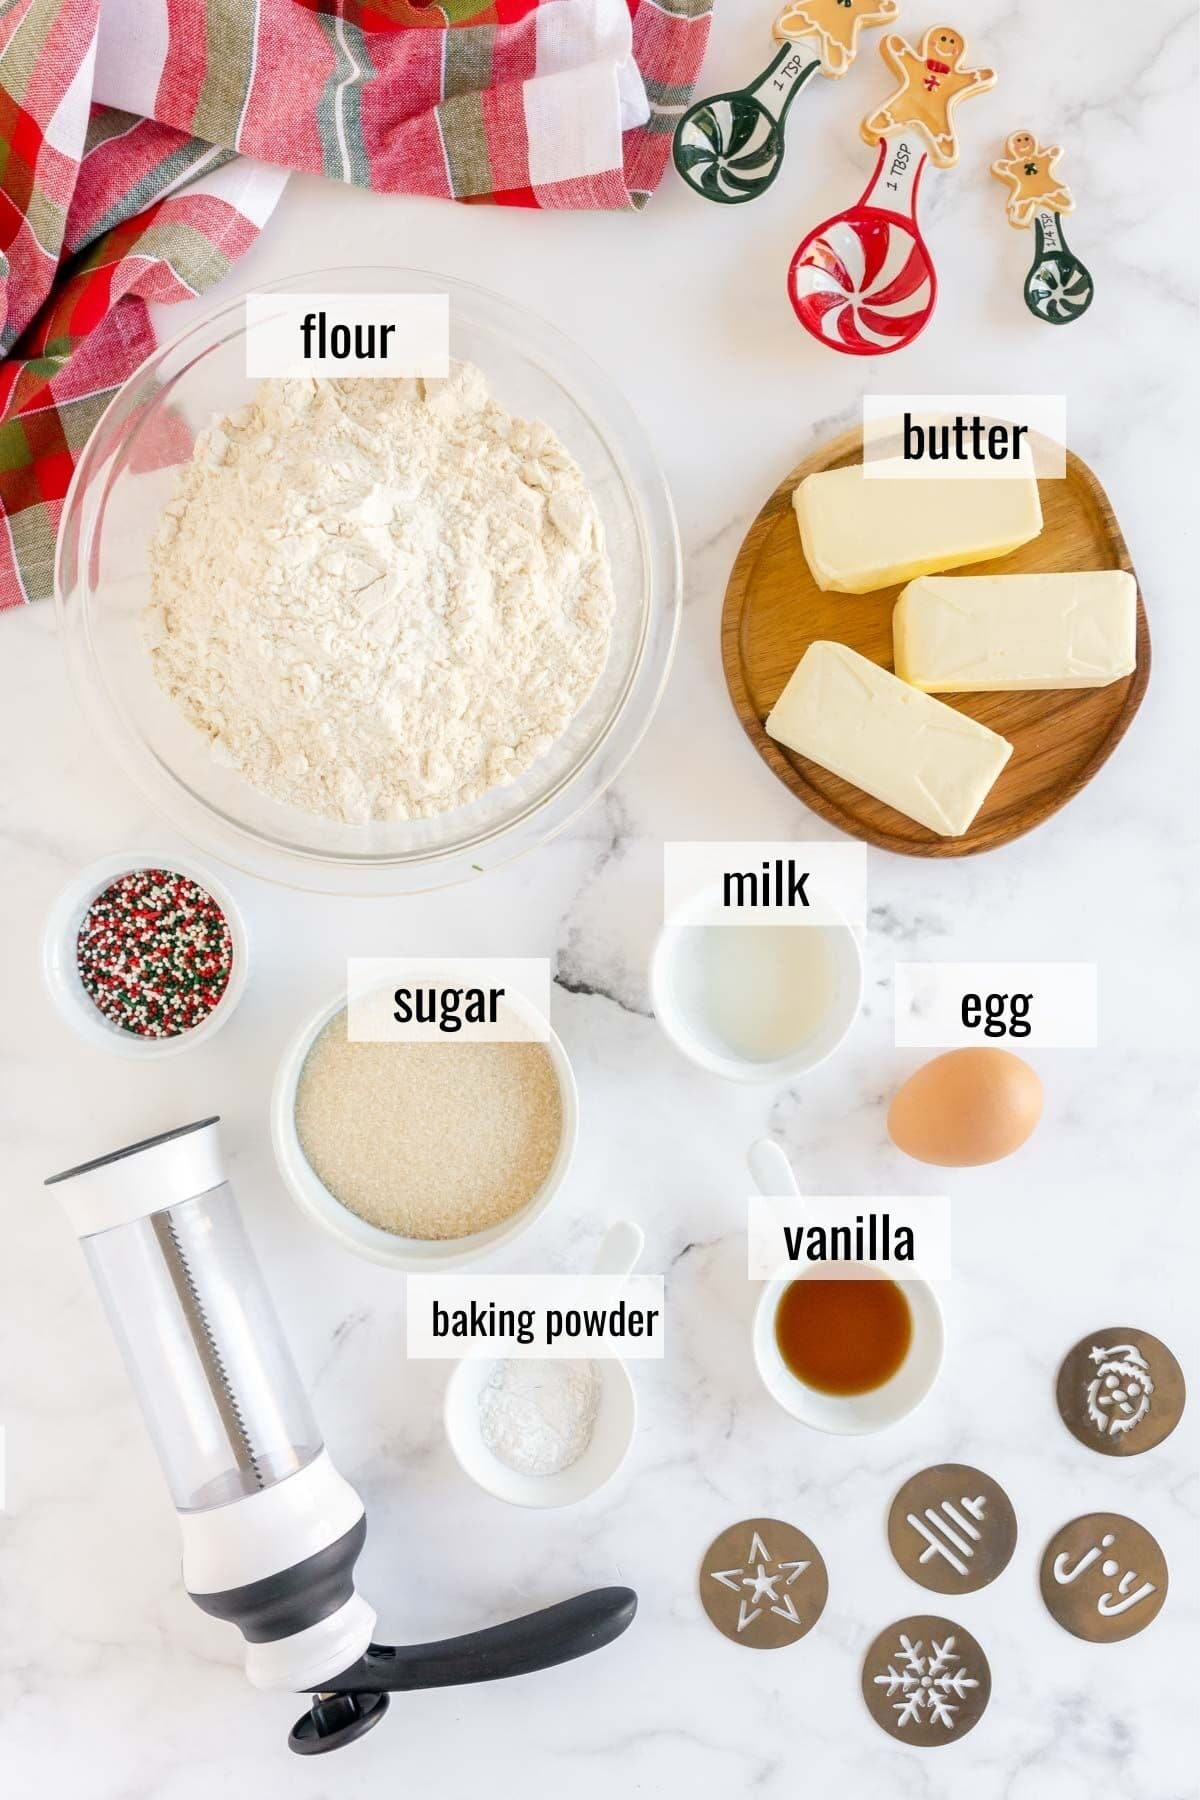
Key Recipe Ingredients
Note: This highlights some ingredients. Full list is in the recipe card.
Would you like to save this recipe?
- Flour. Plain, all-purpose flour.
- Baking Powder.
- Butter. I use salted, but unsalted butter works too.
- Sugar. Plain white sugar.
- Egg. I use large eggs.
- Milk. Any kind you have on hand is good.
- Vanilla extract. You can use almond extract if you prefer.
How to make this recipe
This is a step-by-step photo guide. Full ingredients and instructions are in the printable recipe card below.
JumpGet prepped. Preheat oven to 350°F.
Make the dough
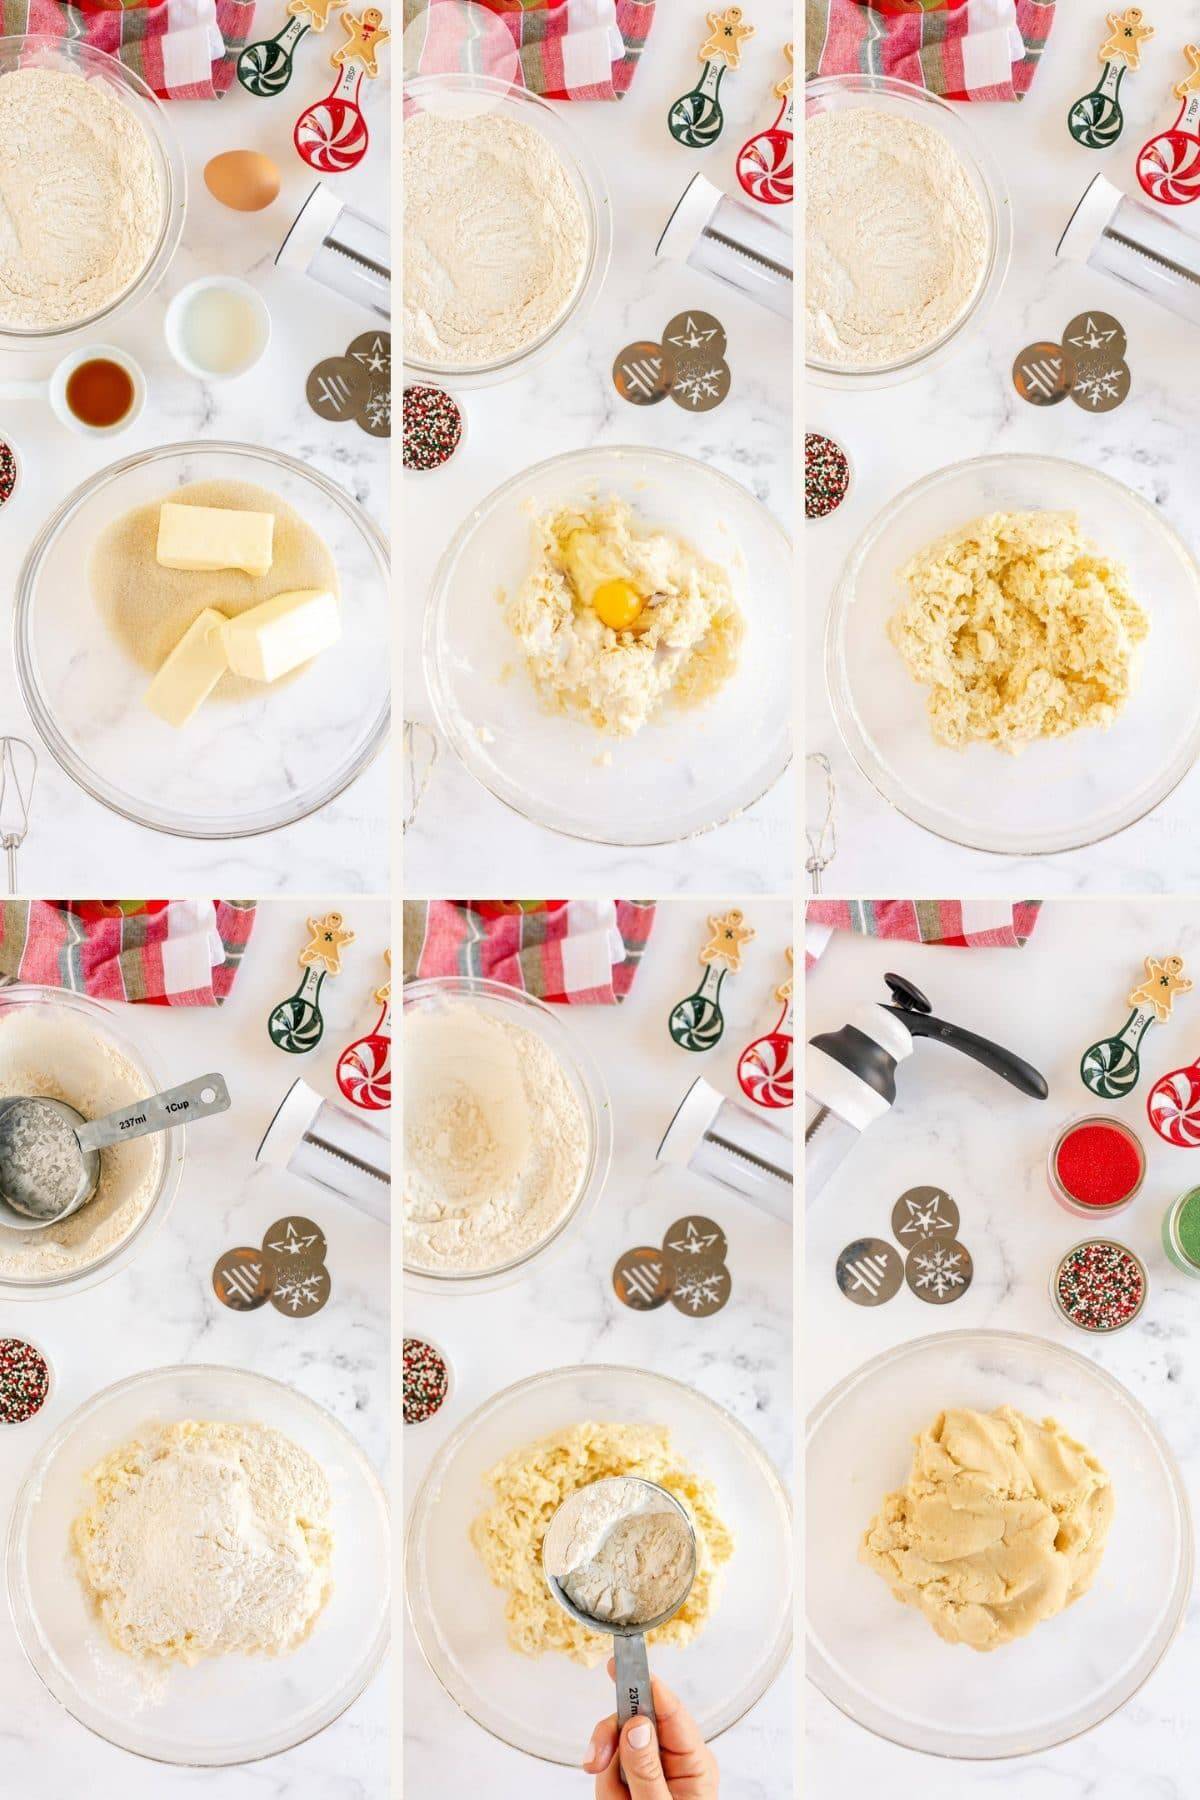
- Combine the flour and baking powder in a large bowl and set aside.
- In the bowl of a stand mixer fitted with the paddle attachment (or use a hand mixer and a large bowl), cream butter and sugar on medium speed until pale, light and fluffy.
- Add egg, milk, vanilla extract and mix well.
- Gradually add the flour mixture to the butter mixture (1 cup at a time). Beat until combined and a soft dough forms.
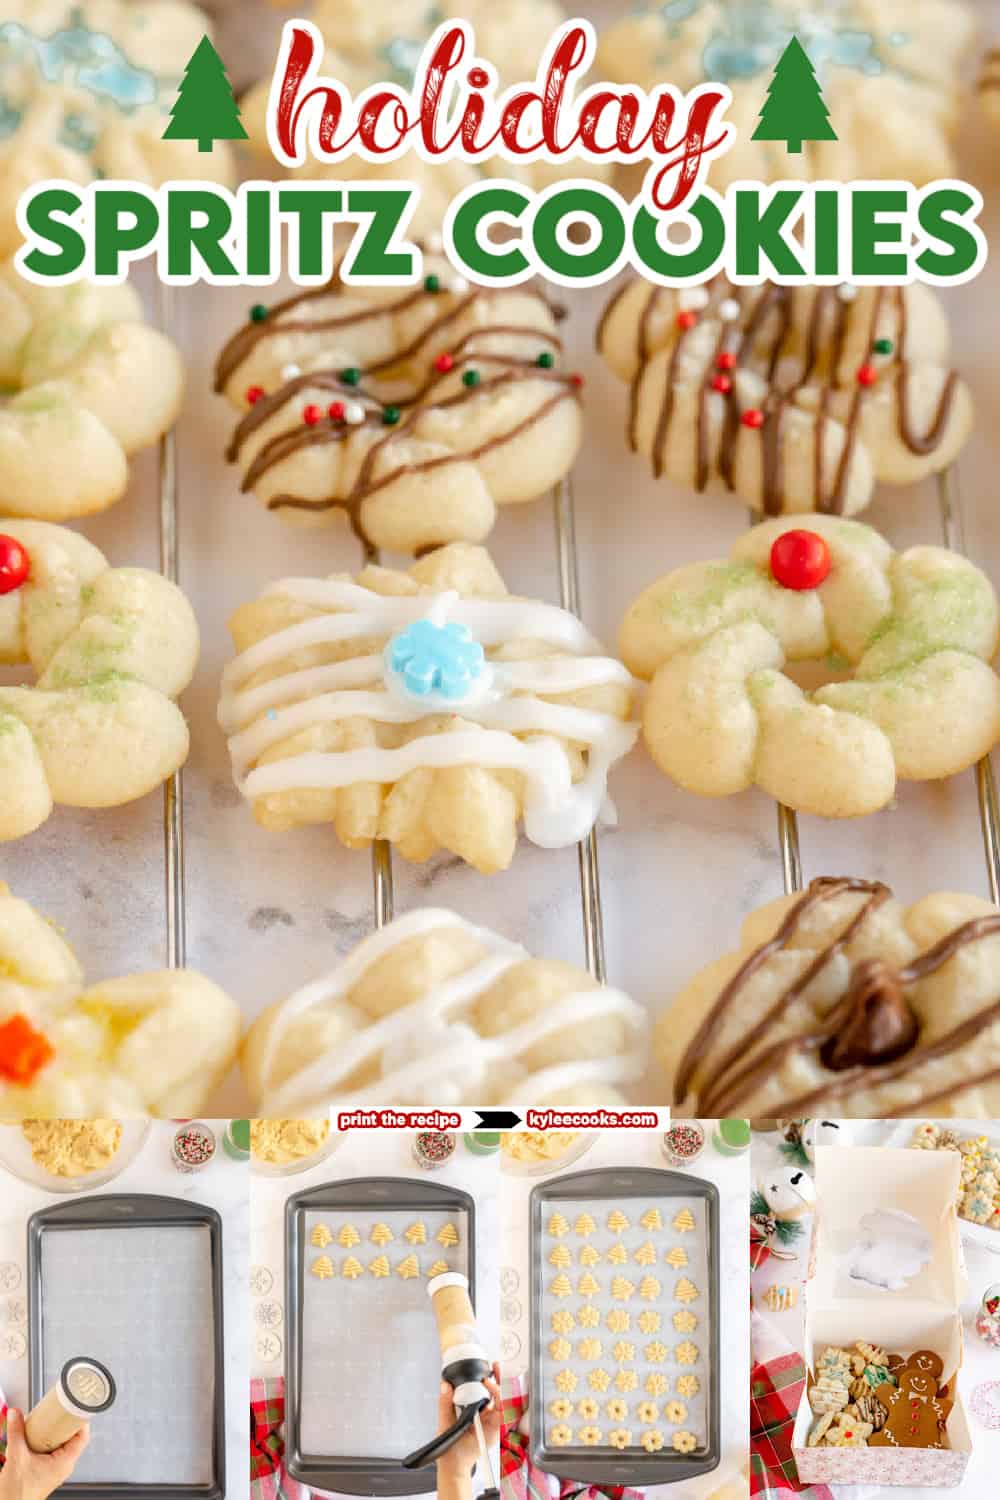
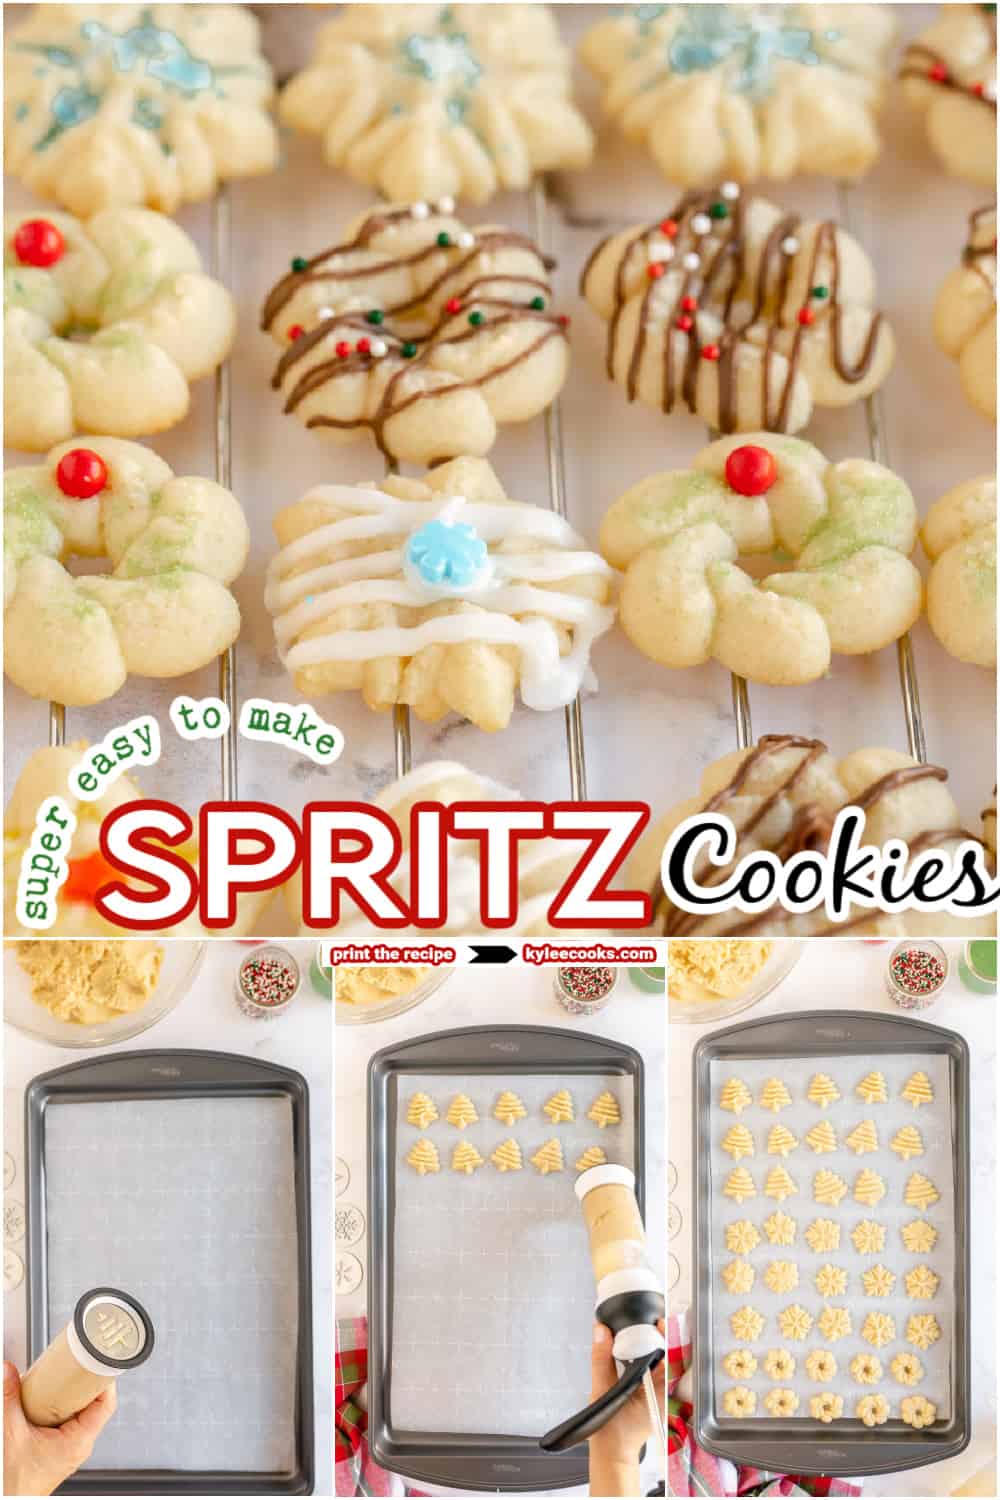
Press the cookies and decorate
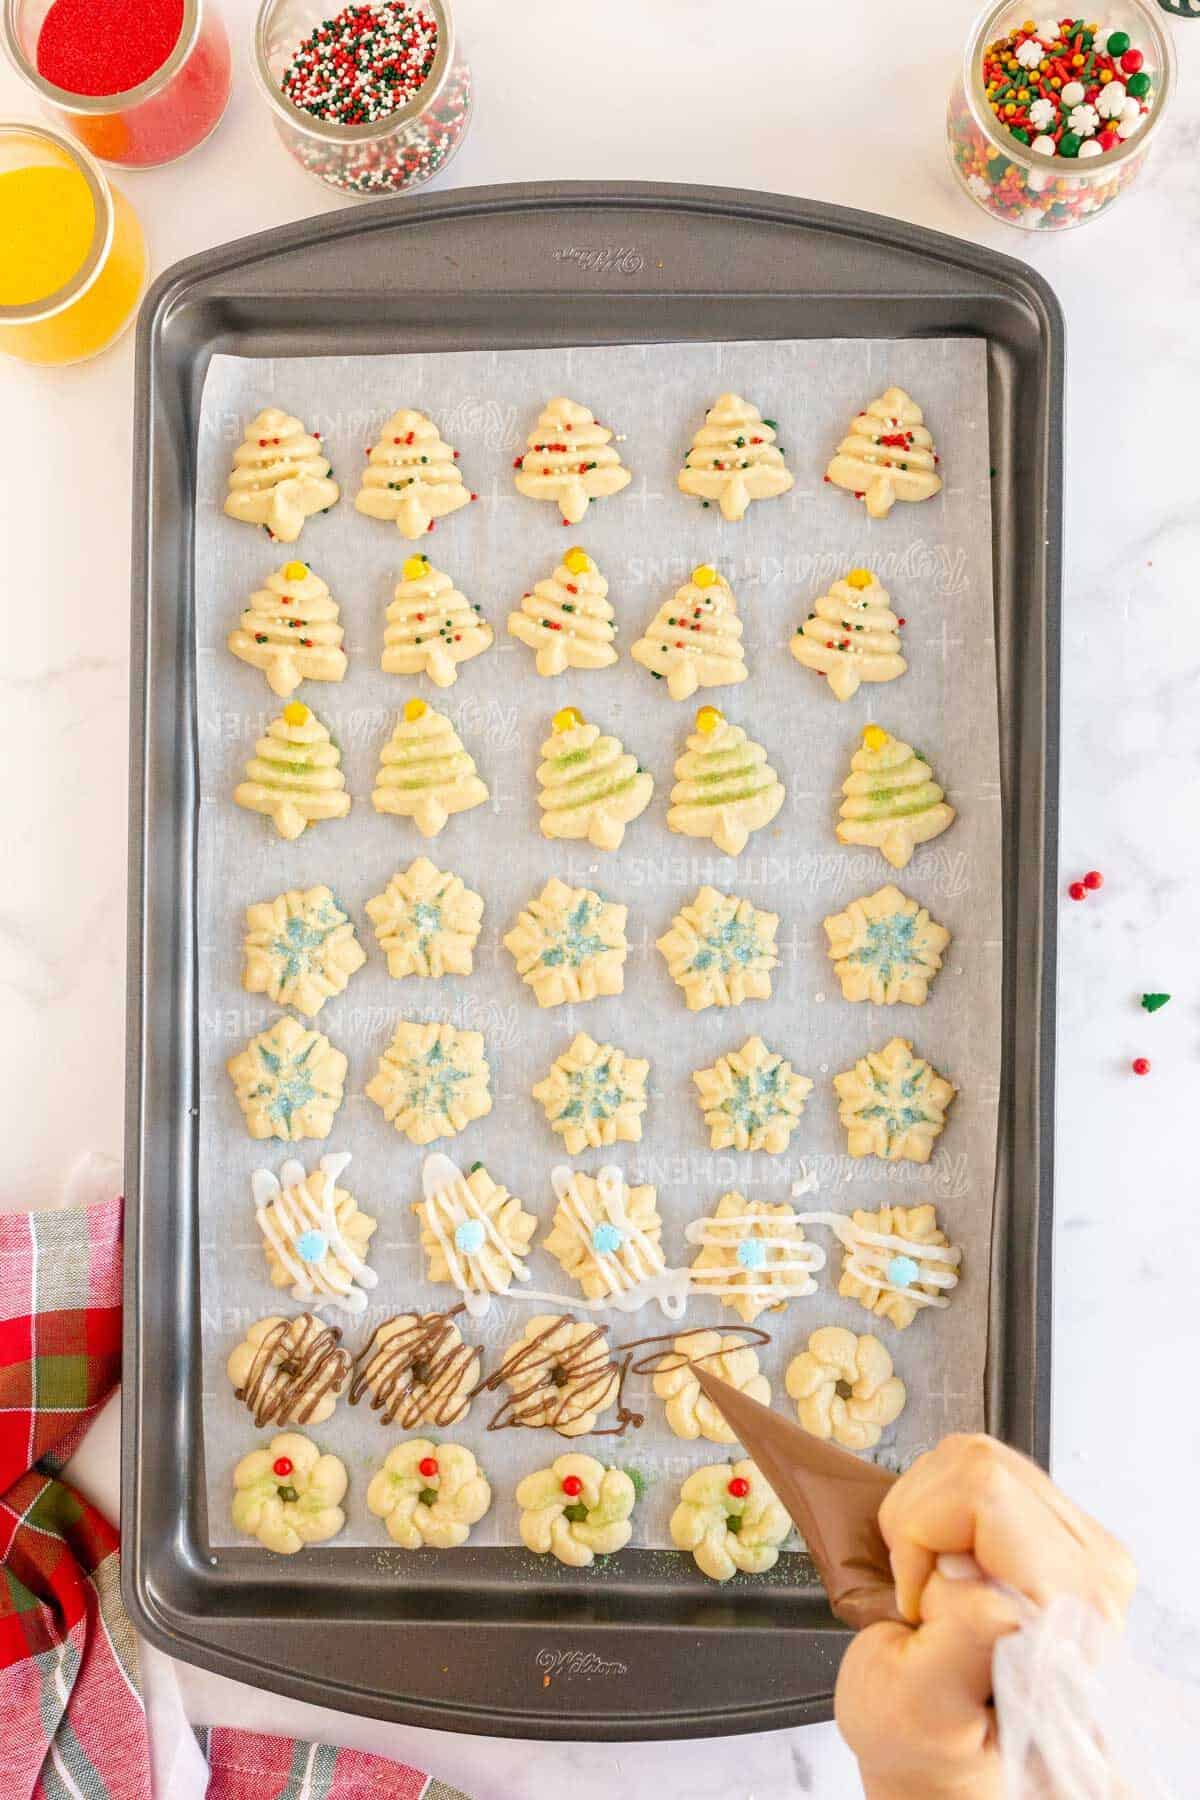
- Fill the cookie press with dough and attach a disk (I always do Christmas trees first). Press dough onto an ungreased cookie sheet. You may like to use parchment paper like I did, but it is not necessary.
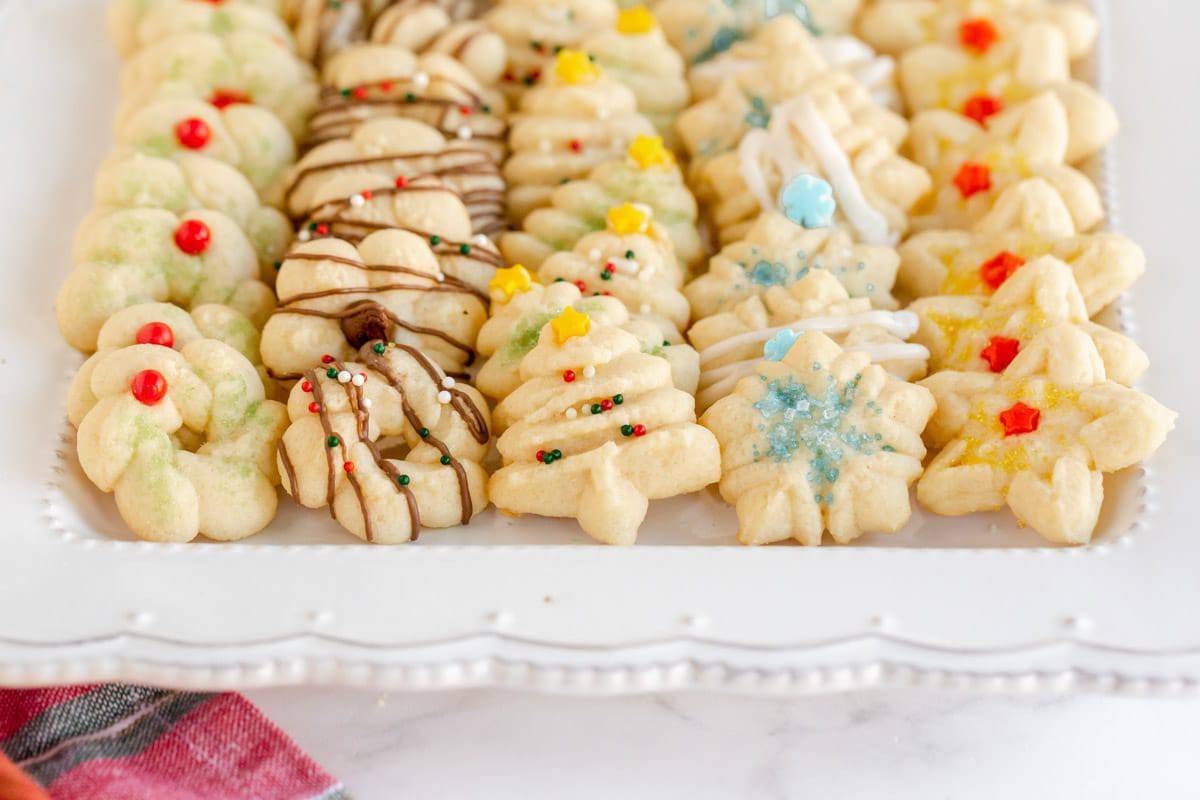
- Decorate with Christmas sprinkles as you wish, or leave plain.

Bake & Cool
- Bake 10-12 minutes or until edges are light golden brown.
- Cool 2 minutes on baking sheet, then transfer to a wire rack to cool completely.
- Decorate with chocolate or frosting if desired.
- Devour.
Kylee’s Notes
Butter consistency matters. This is the #1 thing. Too soft and the cookies spread and lose shape. Too firm and the dough won’t press. You want it soft enough to indent with your finger, but not greasy.
Skip the parchment (at first). It feels wrong, I know. But the dough needs something to grip so it releases from the press. If you use parchment or silicone, it may just stick to the press instead of the pan.
Give the press a little confidence. Hold it flat against the pan and press firmly, then lift straight up. No wiggling or twisting or you’ll get weird shapes.
Work in small batches. If the dough gets too warm while sitting out, it gets harder to work with. If that happens, pop it in the fridge for a few minutes to firm back up.
Test a few first. Bake 2 or 3 cookies to check shape and spread before doing a full tray. It saves you from a whole pan of “what happened here.”
How to store cookies
Store in an airtight container for up to a week, if they last that long!
Substitutions/Additions
You can use vanilla extract and almond extract or peppermint extract in your cookies. They’re yours, so do what you what makes you happy!
If you prefer – add 1/2 teaspoon of cinnamon to the batter, or some cocoa powder.
Want to make different colored cookies? Add a little gel food coloring to your cookie dough and color it up!
These are also super delicious with some confectioners sugar dusted over the top.
Troubleshooting
- Cookies won’t stick to the pan. The dough is likely too cold or the pan is too slick. Let the dough warm up a bit and make sure you’re using an ungreased baking sheet so the dough can grip.
- Cookies won’t release from the press. This usually means the pan is greased or lined. Switch to an ungreased pan and press firmly, then lift straight up.
- Cookies are spreading too much. The butter is too soft or the dough got too warm. Pop the dough in the fridge for 10-15 minutes and try again.
- Dough is hard to press. The butter is too cold. Let the dough sit at room temperature for a few minutes until it softens slightly.
- Shapes look wonky. Some disks are just trickier than others. Try a simpler shape and make sure you’re pressing straight down and lifting straight up.
More recipes to love
- Perfect Chocolate Chip Cookies. Perfect chocolate chip cookies are the go-to, bees-knees, classic kind of cookie. Crispy, with a little chew, bursting with chocolate chips. Heaven.
- Triple Chocolate Cookies. These soft and chewy triple chocolate cookies are dangerous! They have 3 types of chocolate and are decadent and delicious. Grab a glass of milk!
- German Chocolate Cookies. German Chocolate Cake in cookie form! Soft, chewy chocolate cookies topped with a creamy, caramel/coconut/pecan frosting and drizzled with melted chocolate.
- ALL COOKIE RECIPES
Get free recipes in your inbox!
Find me on Pinterest, Facebook & Instagram.
If you make this recipe, please comment and let me know how it turned out and leave a star rating! ⭐⭐⭐⭐⭐

Christmas Spritz Cookies
Equipment
Ingredients
- 3 1/2 cups all-purpose flour
- 1 teaspoon baking powder
- 1.5 cups butter softened
- 1 cup white sugar
- 1 egg
- 2 tablespoons milk
- 1.5 teaspoons vanilla extract
Instructions
- Preheat oven to 350°F.
- Combine 3 1/2 cups all-purpose flour and 1 teaspoon baking powder and set aside.
- In an electric mixer, beat 1.5 cups butter and 1 cup white sugar until light and fluffy.
- Add 1 egg, 2 tablespoons milk, 1.5 teaspoons vanilla extract and mix well.
- Gradually add the flour mixture to the butter mixture (1 cup at a time). Beat until combined.
- Fill cookie press with dough and choose a disks, press cookies onto ungreased cookie sheet.
- Decorate as garishly as possible… 😉
- Bake 10-12 minutes or until edges are light golden brown.
- Cool 2 minutes on cookie sheet, then transfer to cooling rack.
- Devour.
Would you like to save this recipe?
Nutrition
Nutritional information is an estimate and provided to you as a courtesy. You should calculate the nutritional information with the actual ingredients used in your recipe using your preferred nutrition calculator.
Did you make this recipe?
Make sure to follow @kyleecooks on Instagram for more and tag me #kyleecooks so I can see!Update: This recipe was originally published in December of 2020. It was updated with minor changes, and republished in December of 2022.

About Kylee Ayotte
I am a born and raised New Zealander (a Kiwi), now living in Phoenix, Arizona. I’m happily married to the love of my life – a hot American boy I met while traveling the world. I’m a mama to 2 awesome little boys and love red things, rugby, cheesecake, and bacon. Mmmmm. Bacon. Meet Kylee


Can I freeze the dough? Then bake them at a later date?
You can, yes. Be sure to thaw before trying to pipe them, though!