Cherries in the Snow | No Bake Dessert
This post may contain affiliate links. See our affiliate policy here.


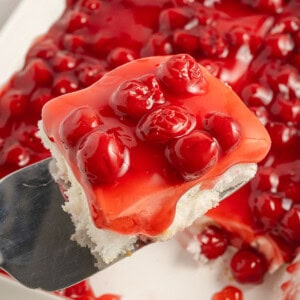
Cherries in the Snow is one of those classic, crowd-pleasing desserts that never goes out of style. It’s light, creamy, and just sweet enough, with layers of fluffy angel food cake, a whipped cream cheese filling, and glossy cherry pie topping. Best part? No oven required. If you’ve got a sweet tooth and zero time to bake, this is the perfect dessert to whip up in a flash.
It’s a favorite around here for the holidays (that red and white is so festive), but honestly, we make it year-round. It’s simple enough for a random Wednesday and pretty enough to bring to a potluck or party. Plus, it tastes even better after a night in the fridge, so you can make it ahead and look like you totally have your life together.
Try my Black Forest cheesecake, my Oreo dirt pudding cups, or my Easy Raspberry Danish for similarly easy desserts!
Step-by-step photos and instructions are below. Jump to the recipe card if you wish!

This easy Cherries in the Snow dessert looks beautiful… until you cut into it, and then it’s messy in the best way. It starts with cubed store-bought angel food cake, layered with a sweet, creamy cheesecake-style filling, and topped with cherry pie filling. Just pop it in the fridge for a few hours and it’s ready to serve. Sweet, tart, simple, and perfect for making ahead.
You will love my Cherry Pie Bars, or my No Bake Blueberry Cheesecake too!
Why you’ll love this
- Easy to make. Simple ingredients and minimal prep work make this dessert a breeze to prepare.
- Adaptable. You can switch up to use any variety of fruit pie filling to suit your preferences or the occasion.
- Crowd-pleaser. This dessert is sure to be a hit at any gathering or potlucks.
Step-by-step photos and tips and tricks are below. Jump to the full recipe card instead

Key Recipe Ingredients
Note: This highlights some ingredients. Full list is in the recipe card.
- Cream cheese. Softened cream cheese is much easier to mix than cold cream cheese. Be sure not to let the cream cheese sit at room temperature for longer than 2 hours. I use full fat cream cheese for the best texture.
- White angel food cake. Forms the base of the dessert. You can use store-bought or homemade angel food cake. I got a round, angel food bundt cake from Target.
You can use a 9-inch round angel food bundt cake, or you can buy a box of angel food cake mix, bake that as directed on the box, and slice that into cubes. - Confectioner’s sugar. Also known as powdered sugar. Regular granulated sugar can be used, but the texture will be slightly grainy.
- Vanilla extract. Almond extract can be used for a different twist.
- Whipped topping. Also known as the brand name Cool Whip. Homemade whipped cream can be used as a substitute. Whip heavy cream with a little vanilla and powdered sugar.
- Cherry pie filling. You can use any pie filling or fresh fruit compote as an alternative. Try this recipe with apple, blueberry pie filling, strawberry or raspberry pie filling on top.

How to make this recipe
This is a step-by-step photo guide. Full ingredients and instructions are in the printable recipe card below.
Cut the angel food cake into small, 1-inch cubes. Soften the cream cheese and measure out the confectioner’s sugar, vanilla extract, and whipped topping. Open the cans of cherry pie filling.
Would you like to save this recipe?
STEP 2: Make the filling
In a large bowl, use an electric mixer to whip together the cream cheese, powdered sugar and vanilla extract until smooth and creamy.
Gently fold in the whipped topping until it is thoroughly combined and set the bowl aside.


STEP 3: Assemble
Place the angel food cake cubes in a tightly packed single layer at the bottom of a 9×13 baking dish or pan.
Spoon the cream cheese mixture over the angel food cake. Carefully spread it out evenly, pressing it into the gaps between the angel food cake pieces.


Pour the two cans of cherry pie filling on top of the dessert and use a spoon to spread it out evenly.
Cover the dessert with plastic wrap, and chill for at least 4 hours.


FAQs
You can use sponge cake, pound cake, or any light and airy cake as an alternative.
You can soften cream cheese quickly by cutting it into small pieces and letting it sit at room temperature for about 15-20 minutes.
Yes, if you don’t love the cherry flavor – you can use any type of pie filling or fresh fruit compote that you prefer. Try apple, blueberry or strawberry (but you’ll have to rename your dessert!)
Because the bright cherries against the white cake and filling looks literally like cherries in the snow! It has such gorgeous color!
Kylee’s Notes
For extra height or bigger servings, cut up two angel food cakes.
Soften the cream cheese. Make sure your cream cheese is fully softened to ensure a smooth and creamy filling. The cream cheese should be smooth and lump-free before you add the whipped topping.
Refrigerate thoroughly. Allowing the dessert to chill for the full 4 hours ensures the layers set properly and the flavors meld together.
No-Baking Tips
Some Cherries in the Snow recipes say to mix the angel food cake in with the filling, but I found that the angel food cake got too soggy and didn’t have its signature fluffiness and bounce when it was mixed in. Separating the layers created different textures.
An offset spatula works great for smoothing out the cheesecake layer.
Storage Instructions
Refrigerator: This can be kept in the fridge for up to 2 days when covered with plastic wrap, or in an airtight container.

Get free recipes in your inbox!
Find me on Pinterest, Facebook & Instagram.
If you make this recipe, please comment and let me know how it turned out and leave a star rating! ⭐⭐⭐⭐⭐
Cherries in the Snow
Ingredients
- 1 pound cream cheese softened
- ½ cup powdered sugar
- 1 teaspoon vanilla extract
- 8 ounces whipped topping thawed
- 10 ounces angel food cake
- 42 ounces cherry pie filling 2 cans 21oz cans
Instructions
Get prepped
- Cut the angel food cake into 1-inch cubes. Soften 1 pound cream cheese and measure out ½ cup powdered sugar, 1 teaspoon vanilla extract, and 8 ounces whipped topping. Open the cans of 42 ounces cherry pie filling.
Make the filling
- In a large mixing bowl, use an electric mixer to mix the cream cheese, confectioner’s sugar, and vanilla extract until smooth and creamy.
- Fold in the whipped topping until it is thoroughly combined and set the bowl aside.
Assemble
- Place the 10 ounces angel food cake cubes in a tightly packed single layer at the bottom of a 9×13 baking dish or pan.
- Spoon the cheesecake layer over the angel food cake and carefully spread it out evenly, pressing it into the gaps between the angel food cake pieces.
- Pour the two cans of cherry pie filling on top of the dessert and use a spoon to spread it out evenly.
- Cover the dessert with plastic wrap, and chill for at least 4 hours.
Serve
- Serve chilled.
Notes
Would you like to save this recipe?
Nutrition
Nutritional information is an estimate and provided to you as a courtesy. You should calculate the nutritional information with the actual ingredients used in your recipe using your preferred nutrition calculator.
Did you make this recipe?
Make sure to follow @kyleecooks on Instagram for more and tag me #kyleecooks so I can see!
About Kylee Ayotte
I am a born and raised New Zealander (a Kiwi), now living in Phoenix, Arizona. I’m happily married to the love of my life – a hot American boy I met while traveling the world. I’m a mama to 2 awesome little boys and love red things, rugby, cheesecake, and bacon. Mmmmm. Bacon. Meet Kylee


Can I make the just the filling the day before and then on the day of event add it together with the cake on bottom. I like your idea of not mixing cake with the filling
That sounds like a great idea!